Android Handlers, Loopers, Message Queues and communication between Threads
In Android applications, as well as in applications with a GUI in general,
doing work in the background is essential as we do not want the UI to be
blocked by long running tasks that may cause it to appear to be frozen.
The Android Framework provides a simple but interesting mechanism for
communicating with background threads via the use of the Message and
Handler classes. In this post I will attempt to explain not only how to use
them, but also how they relate to the Looper and the MessageQueue
classes.
The Main Loop
As you probably already know by now, your application has a main loop that runs infinitely (or at least until you tell it to quit). This main loop waits for events - or messages - to arrive and handles them accordingly. These events can range from user generate events (such a button being tapped), to drawing events or changes in the lifecycle of your current Activity. This isn’t any different from how desktop applications have always worked, however, taking a look at how it was implemented in Android can be rather interesting and can also give you an insight on how things are working under the hood.
Let’s look at all the parts involved one by one first, then we can put it all together in a more complete example. I will be also linking to the relevant parts of the Android source for each of the different components.
The Message class
Message
instances are objects that can be used to pass data around between Threads (and
even between processes).
Messages are rather simple (you can check out the implementation
here),
and can hold any data you may need when talking to other threads or processes.
There isn’t much more to say about Messages other than we will be seeing them
in action later.
The MessageQueue class
The MessageQueue
class is the basic building block of all this. MessaqueQueue instances
basically hold a list of all events or messages that need to be taken care of.
You can look at the implementation of the MessageQueue
here.
As you probably guessed, what handles the events we mentioned before in your
Main Thread is a MessageQueue instance. However, the component that does a lot
of the heavy lifting isn’t the MessageQueue, it’s actually the Looper.
The Looper class
The Looper
class really is the heart of all this. First and foremost, Looper instances
are the ones that actually hold and create a MessageQueue and iterate over
the pending messages, blocking if none are available. In the case of our
Main Thread, it is a looper that blocks it until an event occurs (for example
the user tapping a button in the UI) and finally delivers that event to whoever
should handle it (more about that later). This can be seen in action in the
implementation of the loop() method.
One key thing to notice here is how Looper instances relate to Threads.
If you look closely at the implementation of the Looper class, you can see
that it does not have any public constructors. In order to obtain an instance,
the
static method prepare()
must be called.
Loopers are associated with one Thread only, the Thread in which they
were prepared. Threads can also have only one Looper.
The Handler class
After all this buildup we finally get to the
Handler
class.
Handlers are what actually handle the Messages that end up in a MessageQueue.
“Handle” in this case does not mean just process an incoming message, it
is also means adding and removing messages from a MessageQueue as we can
interact with a MessageQueue via Handlers.
Handlers are always associated with one Looper instance as well, and therefore
with one Thread and one MessageQueue. However, unlike Loopers, many Handlers
can exist for one Thread.
When a message is delivered to a Handler, its onMessage() method is called on
that Handler’s Thread, this means that posting a Message to a Handler can be
used as a means of communicating between Threads. This is very powerful
when we consider that Runnables can also be posted to a Handler, not just
Message instances.
One important thing to also remember is that we will be asking Handlers for Message instances, not creating them directly and that these instances are reused.
In short: if we want a Thread to function as an event loop and be able to receive Messages from other Threads, we must:
- Call the
Looper.prepare()method. This will create a Looper instance for that Thread as well as a MessageQueue. - Create a Handler (or several). This Handler will automatically be associated with the Looper of the Thread that created it.
- Call the
Looper.loop()method so that the MessageQueue for that Thread starts running. - From another Thread call the
obtain()method of the Handler we want to send messages to. - Add our data and call
sendMessage(Message)on the Handler so that the Message gets posted to the MessageQueue of that Handler’s Thread.
Putting it all together
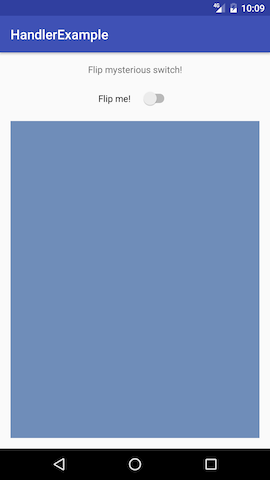
In order to fully understand how all these pieces relate, lets look at a simple example. We will be creating a simple activity with two views, a switch and a regular view which we will change the background coloR of periodically.
Out Application's Activity
In order to do this, we will have two Threads. One the one hand, our Main
Thread will handle updating the UI as well as UI events (such as the switch
being turned on or off). On the other hand, we will have a background Thread.
This Thread will create a random color periodically, and will tell the Main
Thread, via a Message, to update the UI. Our background Thread will live as
long as out Activity is showing so we will handle creating and destroying it in
the onResume and onPause methods of our activity respectively
Remember that switch we added to our activity? Well, it wasn’t just for
decoration. With that switch we will be telling our background Thread that we
want it to create (or to stop creating) random colors for us. How will we do
this you ask? Passing Messages back and forth is the answer. This means that
when we flip the switch on it will send a Message to the background Thread
telling it to start generating colors. The background Thread will then create a
new color and will send it to the Main Thread to have it update the UI and will
keep doing so every second. When we flip the switch off, we will send another
Message to the background Thread telling it to stop creating random colors.
This means we will need two Handlers, one for the Main Thread and one for the
background Thread. Let’s take a look at how we will handle messages in the Main
Thread first:
The code is rather straightforward, however, there are two things we should
look at here. The first is that we create and assign our Handler at the same
time. The Android Framework will create our Activity on the Main Thread which
means this newly created Handler will handle messages for the Main Thread.
Also note that the Main Thread of an application already works as an event
loop, meaning a Looper has already been created for that Thread and is ready to
have Handlers “attach” to it. The second thing we should take a look at here is
how the color we created is passed. Data can be added to a
Message in
two different ways. The first is using the arg1, arg2 and obj attributes.
Using these attributes is an inexpensive way of passing data around and should
be used whenever possible, as there is little overhead. In this case we want to
pass a simple integer, so arg1 will do just fine. If we want to pass an
Object, then we have to use the obj attribute. This, however, has one
important restriction.
From the documentation
An arbitrary object to send to the recipient. When using Messenger to send the message across processes this can only be non-null if it contains a Parcelable of a framework class (not one implemented by the application). For other data transfer use
setData(Bundle).
This means that in some cases the second way of passing data, the setData
method should be used. Using setData also means doing more work, so it should
be avoided whenever possible as to avoid unnecessary overhead.
We can now take a look at how the handler for the background Thread should be created:
As with the Handler in the Main Thread, there are a few things to note here.
For starters, we do not define the Handler the same way we did in the Main
Thread. If we did, the Handler would be attached to the Main Thread, as the
assignment would happen on there. That means we have to create our Handler in
the run method, as that is what is actually run in parallel, but not before
we prepared a Looper for that Thread (if we did we would get an exception).
Other noteworthy things are what happens when the background Thread gets a
message telling it to stop (it simply removed all pending messages from the
queue) and how the background Thread keeps generating colors at a random
interval (it just enqueues a message to be processed at a set time).
The rest of the code of the Activity should be fairly easy to follow.
The end result
The complete code (with comments!) for the activity can be found here. If you want you can also just clone the whole repository here and try it out yourself in your phone or an emulator.
If you find any issues with the code or can think of ways to improve it, please feel free to submit a Pull Request.
Our end result
HandlerThread
The previous example was rather simple and easy to follow, however, the Android Framework provides us with a nifty class we can take advantage of in order to do less work.
When creating a new Thread by hand, we can inherit from HandlerThread which makes things even easier. HandlerThread can be used for starting a new Thread to which we can easily attach handlers to. This would have actually been perfect for the example we just saw, instead of subclassing Thread, preparing the Looper etc, we could have just created an instance of this class.
Conclusion
Although message passing in an event loop can feel at times a bit barebones and crude, it is actually really powerful tool for communicating between threads and components. Understanding how this works also gives us a lot of insight into the inner workings of the Android Framework, thus helping us create better, more reliable and easier to maintain applications.